安装 Chrome vue 调试工具
打开谷歌应用商店搜索 Vue.js devtools 并添加至 Chrome
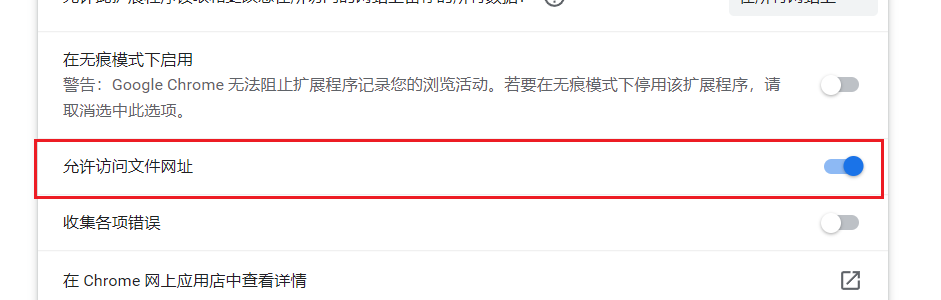
在谷歌浏览器扩展程序页面找到刚才添加的扩展程序,点击详情

在下面找到 允许访问文件网址 打开这个设置
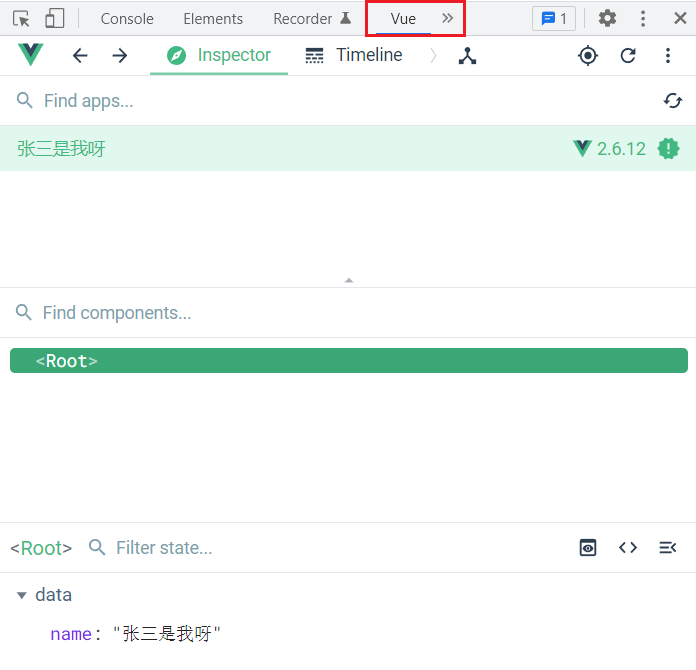
在渲染vue页面的时候,打开控制台,可以看到vue选项,就可以开始使用 Vue.js devtools 了
什么是Vue?
简介
vue是构建用户界面的框架
学习vue,就是在学习vue框架中规定的用法,框架是一套现成的解决方案,程序员只能遵守框架的规范去编写自己的功能。我们需要学习vue的指令,组件,路由,Vuex,vue组件库等
Vue特性
数据驱动视图
vue会监听数据的变化,从而自动重新渲染页面的结构
数据驱动视图是单向的数据绑定
双向数据绑定
js数据的变换会被自动渲染到页面
页面表单变化后不需要手动操作DOM,就可以获取表单的值
MVVM
Model:表示当前页面渲染所依赖的数据源
View:表示当前页面所渲染的DOM结构
ViewModel:表示vue的实例,他是MVVM的核心
data中的所有属性,最后都出现在了vm上
vm上所有属性,以及Vue原型上的所有属性在Vue模板中都可以直接使用。
使用Vue
快速开始
我们可以去vue官网下载vue.js 文件,并在 script 标签中导入使用
1
2
3
4
5
6
7
8
9
10
11
12
13
14
15
16
17
18
19
20
21
22
23
24
25
26
27
28
29
30
|
<body>
<div id="root">
<h1>Hello,{{name}}</h1>
<p>1+2的结果是{{1+2}}</p>
<p>{{name}} 反转后是:{{name.split('').reverse().join('')}}</p>
</div>
<script src="./lib/vue.js" type="text/javascript"></script>
<script type="text/javascript">
Vue.config.productionTip = false
const x = new Vue({
el: '#root',
data: {
name: "张三是我呀"
}
})
</script>
</body>
|
Vue指令
指令是vue为开发者提供的模板语法,用于辅助开发者渲染页面的基本结构u
内容渲染指令
常见的内容渲染指令有
v-text:指令会覆盖元素内部的原有内容
1
2
3
4
5
6
7
8
9
10
11
12
13
14
15
| <div class="ptext">
<p v-text="username"></p>
<p v-text="gender">性别</p>
</div>
<script>
const ptext = new Vue({
el:".ptext",
data:{
username:'yjr1100',
gender:'你猜'
}
})
</script>
|
{{}} 插值表达式:只是内容的占位符,不会覆盖原有内容
只能用在内容节点,不可以用在属性节点,在插值表达式中还可以进行javascript的操作,如调用函数,加减运算,字符串拼接等
1
2
3
4
5
6
7
8
9
10
11
12
13
14
15
16
17
| <div id="chazhitext">
<p>姓名:{{username}}</p>
<p>性别:{{gender}}</p>
</div>
<script>
const chazhitext = new Vue({
el:"#chazhitext",
data:{
username:'yjr1100',
gender:'你猜'
}
})
</script>
|
v-html:把带有标签的字符串,渲染为html标签
1
2
3
4
5
6
7
8
9
10
11
12
13
14
| <div id="htmltext">
<p v-html="info"></p>
</div>
<script>
const htmltext = new Vue({
el:"#htmltext",
data:{
info:'<h4 style="color:red;font-weight:bold;">我是yjr1100</h4>'
}
})
</scrip>
|
属性绑定指令
功能:用于解析标签(包括:标签属性,标签体内容,绑定事件。。。)
例子:v-bind:placeholder="xxx" 或简写 :placeholder="xxx",xxx同样js表达式, 可以读取到data中的数据
备注:Vue中有很多的指令,且形式都是v-???,此处拿v-bind举例子
如果绑定的内容需要动态拼接,则字符串外面需要用单引号包裹,比如:
<div :title="'box'+index">我的title动态计算出是 box3</div>
1
2
3
4
5
6
7
8
9
10
11
12
13
14
15
16
17
18
19
20
21
22
| <div id="app">
<input type="text" v-bind:placeholder="tips">
<hr>
<img :src="poto" alt="" style="width:80px">
<hr>
<div :title="'box'+index">我的title动态计算出是 box3</div>
</div>
<script>
const vm = new Vue({
el:"#app",
data:{
index:3,
tips:"请输入用户名",
poto:"https://cn.vuejs.org/images/logo.svg"
}
})
</script>
|
事件绑定指令
v-on 事件绑定
辅助DOM元素的绑定事件监听
v-on:click = “xxxx” xxxx是事件处理函数的名字 ,可以v-on:简写为 @
下面实现给按钮绑定一个事件,点击后 count+1
在绑定事件后,可以在小括号中进行传参
1
2
3
4
5
6
7
8
9
10
11
12
13
14
15
16
17
18
19
20
21
22
23
24
25
26
27
28
|
<div id="root">
<p>count的值是:{{count}}</p>
<button v-on:click = "add(2)" style="background-color:#fff">+2</button>
<button @click = "sub" style="background-color:#fff">-1</button>
</div>
<script>
new Vue({
el:"#root",
data:{
name:"张三",
count:1
},
methods:{
add:function(a){
this.count +=a;
},
sub(){
this.count -=1;
}
}
})
</script>
|
事件绑定对象
在我们没有给绑定函数传参时,默认有一个事件对象e,如果事件传参了,那么事件对象e就会被覆盖
想要再次获取到事件对象e,vue 提供了内置变量,名字叫做$event,就是原生对象
我们如果传参后还想拿到事件对象,那么我们需要把 $event 传入函数中
1
2
3
4
5
6
7
8
9
10
11
12
13
14
15
16
17
18
19
20
21
22
23
24
25
26
27
28
29
30
|
<div id="root">
<p>count的值是:{{count}}</p>
<button @click = "add(1,$event)">+N</button>
</div>
<script>
console.log(this)
new Vue({
el:"#root",
data:{
count:1
},
methods:{
add(n,e){
this.count +=n;
console.log(e)
if(this.count%2===0){
e.target.style.backgroundColor = 'red';
}else{
e.target.style.backgroundColor = ' '
}
}
}
})
</script>
|
事件修饰符
当我们点击a链接的时候,默认会发生网页的跳转
如果我们想要阻止默认行为,除了使用 event.stopPropagation() 和 event.preventDefault() 我们就可以使用 vue 的事件修饰符,把修饰符通过 . 夹在绑定事件的后面,方便对事件出发的控制
常用事件修饰符:
.prevent 阻止默认行为
.stop 阻止事件冒泡
.capture 以捕获模式触发当前的事件处理函数
.once 绑定的事件只触发1次
.self 只有当 event.target 是当前元素自身时出发事件处理函数
1
2
3
4
5
6
7
8
9
10
11
12
13
14
15
16
17
18
19
|
<div id="root">
<a href="http://www.baidu.com/" @click.prevent="show">跳转到百度首页</a>
</div>
<script>
console.log(this)
new Vue({
el:"#root",
data:{
count:1
},
methods:{
show(){
document.write("点击了a连接")
}
}
})
</script>
|
双向绑定指令
vue 中有2种数据绑定的方式:
单向绑定(v-bind):数据只能从data流向页面。
双向绑定(v-model):数据不仅能从data流向页面,还可以从页面流向data
v-model 只能用于表单类元素的数据双向绑定,v-model 默认收集的就是value值。可以简写
1
2
3
4
5
6
7
8
9
10
11
12
13
14
15
16
17
18
19
20
21
22
23
24
25
26
27
28
29
|
<div id="root">
单向数据绑定:<input type="text" v-bind:value = "name"><br>
双向数据绑定:<input type="text" v-model:value = "name"><br>
<hr>
单向数据绑定简写:<input type="text" :value = "name"><br>
双向数据绑定简写:<input type="text" v-model= "name">
<hr>
<select v-model="city">
<option value="">请选择城市</option>
<option value="1">背景</option>
<option value="2">长沙</option>
<option value="3">广州</option>
</select>
</div>
<script>
new Vue({
el:"#root",
data:{
name:"张三",
city:""
}
})
</script>
|
v-model 有一些特定的修饰符,来方便对用户输入的内容进行处理
.number 将用户输入的值转为数值类型
.trim 将用户输入的首位空白字符过滤掉
.lazy 在“change”时而不是“input”的时候进行数据更新
1
2
3
4
5
6
7
8
9
10
11
12
13
14
15
16
17
18
19
20
21
| <div id="root">
<input type="text" v-model.number="n1">+<input type="text" v-model.number="n2"> = <span>{{n1+n2}}</span>
<hr>
<input type="text" v-model.lazy.trim="name">
<button @click="showName">控制台显示用户名</button>
</div>
<script>
new Vue({
el:"#root",
data:{
n1:0,
n2:0,
name:""
},
methods:{
showName(){
console.log(`用户名是:${this.name}`);
}
}
})
</script>
|
条件渲染指令
条件渲染用来帮助开发者按照控制需求来控制DOM元素的隐藏和显示
v-if :每次会动态的移除和添加元素
v-show :通过display属性来控制元素隐藏和显示
如果要频繁的显示和隐藏,v-show 的性能好一些,如果刚进入页面某些元素不需要展示并且后期也可能不需要展示使用 v-if
1
2
3
4
5
6
7
8
9
10
11
12
13
14
15
16
17
| <div id="root">
<p v-if="flag">v-if的标签</p>
<p v-show="!flag">v-show的标签</p>
</div>
<script>
new Vue({
el:"#root",
data:{
flag:true,
name:"张三",
city:""
}
})
</script>
|
和 v-if 配套使用的还有 v-else-if 和 v-else
列表渲染指令
对于数字和对象这样的数据,需要创建重复的页面结构,我们一般使用列表渲染指令来减少代码的书写
列表数据需要在什么标签进行渲染,就把 v-for 写在哪个标签上
官方建议,只要使用到了v-for命令,那么一定绑定一个 :key 属性
而且尽量把 id 作为 key 的值,使用 index 的值当作 key 没有意义
官方对 key 的值的类型要求只能是:字符串或者数字
key 的值必须是唯一的,不可重复
1
2
3
4
5
6
7
8
9
10
11
12
13
14
15
16
17
18
19
20
21
22
23
24
25
26
27
28
29
| <head>
<link rel="stylesheet" href="https://stackpath.bootstrapcdn.com/bootstrap/3.4.1/css/bootstrap.min.css" integrity="sha384-HSMxcRTRxnN+Bdg0JdbxYKrThecOKuH5zCYotlSAcp1+c8xmyTe9GYg1l9a69psu" crossorigin="anonymous">
</head>
<div id="root">
<table class="table table-bordered table-hover table-striped">
<thead>
<th>索引</th> <th>姓名</th> <th>手机号</th>
</thead>
<tbody>
<tr v-for="(item,index) in list" :key="item.id">
<td>{{index}}</td>
<td>{{item.name}}</td>
<td>{{item.phone}}</td>
</tr>
</tbody>
</table>
</div>
<script>
new Vue({
el:"#root",
data:{
list:[
{ id:1, name:"yjr1100", phone:"1234566" },
{ id:2, name:"yjrfirst", phone:"178984566" },
{ id:3, name:"yjrblog", phone:"1756789566" }
]
}
})
</script>
|
按键修饰符
按键修饰符在触发特定的按键时使用,下面使用esc,enter,a 的按键修饰符进行演示
1
2
3
4
5
6
7
8
9
10
11
12
13
14
15
16
17
18
19
20
| <div id="root">
<input type="text" @keyup.esc="clearinput" @keyup.enter = "commitAjax" @keyup.a="aisin">
</div>
<script>
new Vue({
el:"#root",
methods:{
clearinput(e){
e.target.value = ""
},
commitAjax(){
console.log("触发了ajax方法")
},
aisin(){
console.log("aisin")
}
}
})
</script>
|
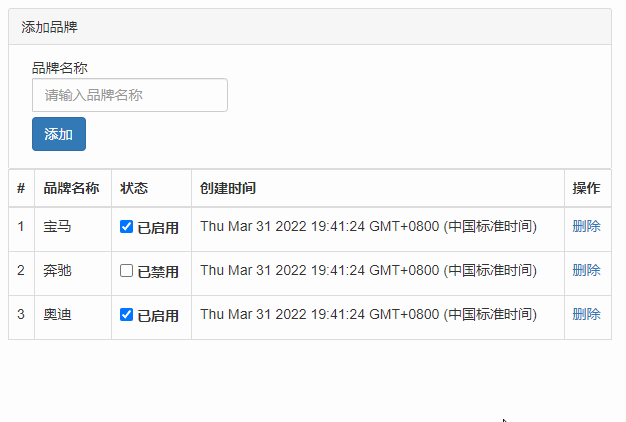
一个小案例
案例来自黑马程序员《品牌列表案例》
1
2
3
4
5
6
7
8
9
10
11
12
13
14
15
16
17
18
19
20
21
22
23
24
25
26
27
28
29
30
31
32
33
34
35
36
37
38
39
40
41
42
43
44
45
46
47
48
49
50
51
52
53
54
55
56
57
58
59
60
61
62
63
64
65
66
67
68
69
70
71
72
73
74
75
76
77
78
79
80
81
82
83
84
85
86
87
88
89
90
91
92
93
94
95
96
97
98
99
100
101
102
103
104
105
106
107
108
109
110
111
112
113
114
115
116
117
118
119
120
121
122
123
124
125
126
127
128
129
130
131
132
133
134
135
136
137
138
139
140
141
142
143
144
145
146
147
148
149
150
151
152
153
154
155
156
157
158
159
160
| <!DOCTYPE html>
<html lang="en">
<head>
<meta charset="UTF-8">
<meta http-equiv="X-UA-Compatible" content="IE=edge">
<meta name="viewport" content="width=device-width, initial-scale=1.0">
<title>品牌列表案例</title>
<link rel="stylesheet" href="https://stackpath.bootstrapcdn.com/bootstrap/3.4.1/css/bootstrap.min.css" integrity="sha384-HSMxcRTRxnN+Bdg0JdbxYKrThecOKuH5zCYotlSAcp1+c8xmyTe9GYg1l9a69psu" crossorigin="anonymous">
<style>
body {
padding: 15px;
user-select: none;
}
.card {
position: relative;
display: -ms-flexbox;
display: flex;
-ms-flex-direction: column;
flex-direction: column;
min-width: 0;
word-wrap: break-word;
background-color: #fff;
background-clip: border-box;
border: 1px solid rgba(0, 0, 0, 0.125);
border-radius: 0.25rem;
}
.card-body {
-ms-flex: 1 1 auto;
flex: 1 1 auto;
min-height: 1px;
padding: 1.25rem;
}
.card-header {
padding: 0.75rem 1.25rem;
margin-bottom: 0;
background-color: rgba(0, 0, 0, 0.03);
border-bottom: 1px solid rgba(0, 0, 0, 0.125);
}
.mb-2{
margin-bottom: 0.5rem !important;
}
.form-row {
display: -ms-flexbox;
display: flex;
-ms-flex-wrap: wrap;
flex-wrap: wrap;
margin-right: -5px;
margin-left: -5px;
}
.col-auto{
position: relative;
width: 100%;
padding-right: 15px;
padding-left: 15px;
}
</style>
</head>
<body>
<div id="app">
<div class="card">
<div class="card-header">
添加品牌
</div>
<div class="card-body">
<form @submit.prevent="add">
<div class="form-row align-items-center">
<div class="col-auto">
<div class="input-group mb-2">
<div class="input-group-prepend">
<div class="input-group-text">品牌名称</div>
</div>
<input type="text" class="form-control" placeholder="请输入品牌名称" v-model.trim="brand">
</div>
</div>
<div class="col-auto">
<button type="submit" class="btn btn-primary mb-2">添加</button>
</div>
</div>
</form>
</div>
</div>
<table class="table table-bordered table-hover table-striped">
<thead>
<tr>
<th scope="col">#</th>
<th scope="col">品牌名称</th>
<th scope="col">状态</th>
<th scope="col">创建时间</th>
<th scope="col">操作</th>
</tr>
</thead>
<tbody>
<tr v-for="item in list" :key="item.id">
<td>{{ item.id }}</td>
<td>{{ item.name }}</td>
<td>
<div class="custom-control custom-switch">
<input type="checkbox" class="custom-control-input" :id="'cb' + item.id" v-model="item.status">
<label class="custom-control-label" :for="'cb' + item.id" v-if="item.status">已启用</label>
<label class="custom-control-label" :for="'cb' + item.id" v-else>已禁用</label>
</div>
</td>
<td>{{ item.time }}</td>
<td>
<a href="javascript:;" @click="remove(item.id)">删除</a>
</td>
</tr>
</tbody>
</table>
</div>
<script src="./lib/vue-2.6.12.js"></script>
<script>
const vm = new Vue({
el: '#app',
data: {
brand: '',
nextId: 4,
list: [
{ id: 1, name: '宝马', status: true, time: new Date() },
{ id: 2, name: '奔驰', status: false, time: new Date() },
{ id: 3, name: '奥迪', status: true, time: new Date() },
],
},
methods: {
remove(id) {
this.list = this.list.filter(item => item.id !== id)
},
add() {
if (this.brand === '') return alert('必须填写品牌名称!')
const obj = {
id: this.nextId,
name: this.brand,
status: true,
time: new Date()
}
this.list.push(obj)
this.brand = ''
this.nextId++
}
},
})
</script>
</body>
</html>
|