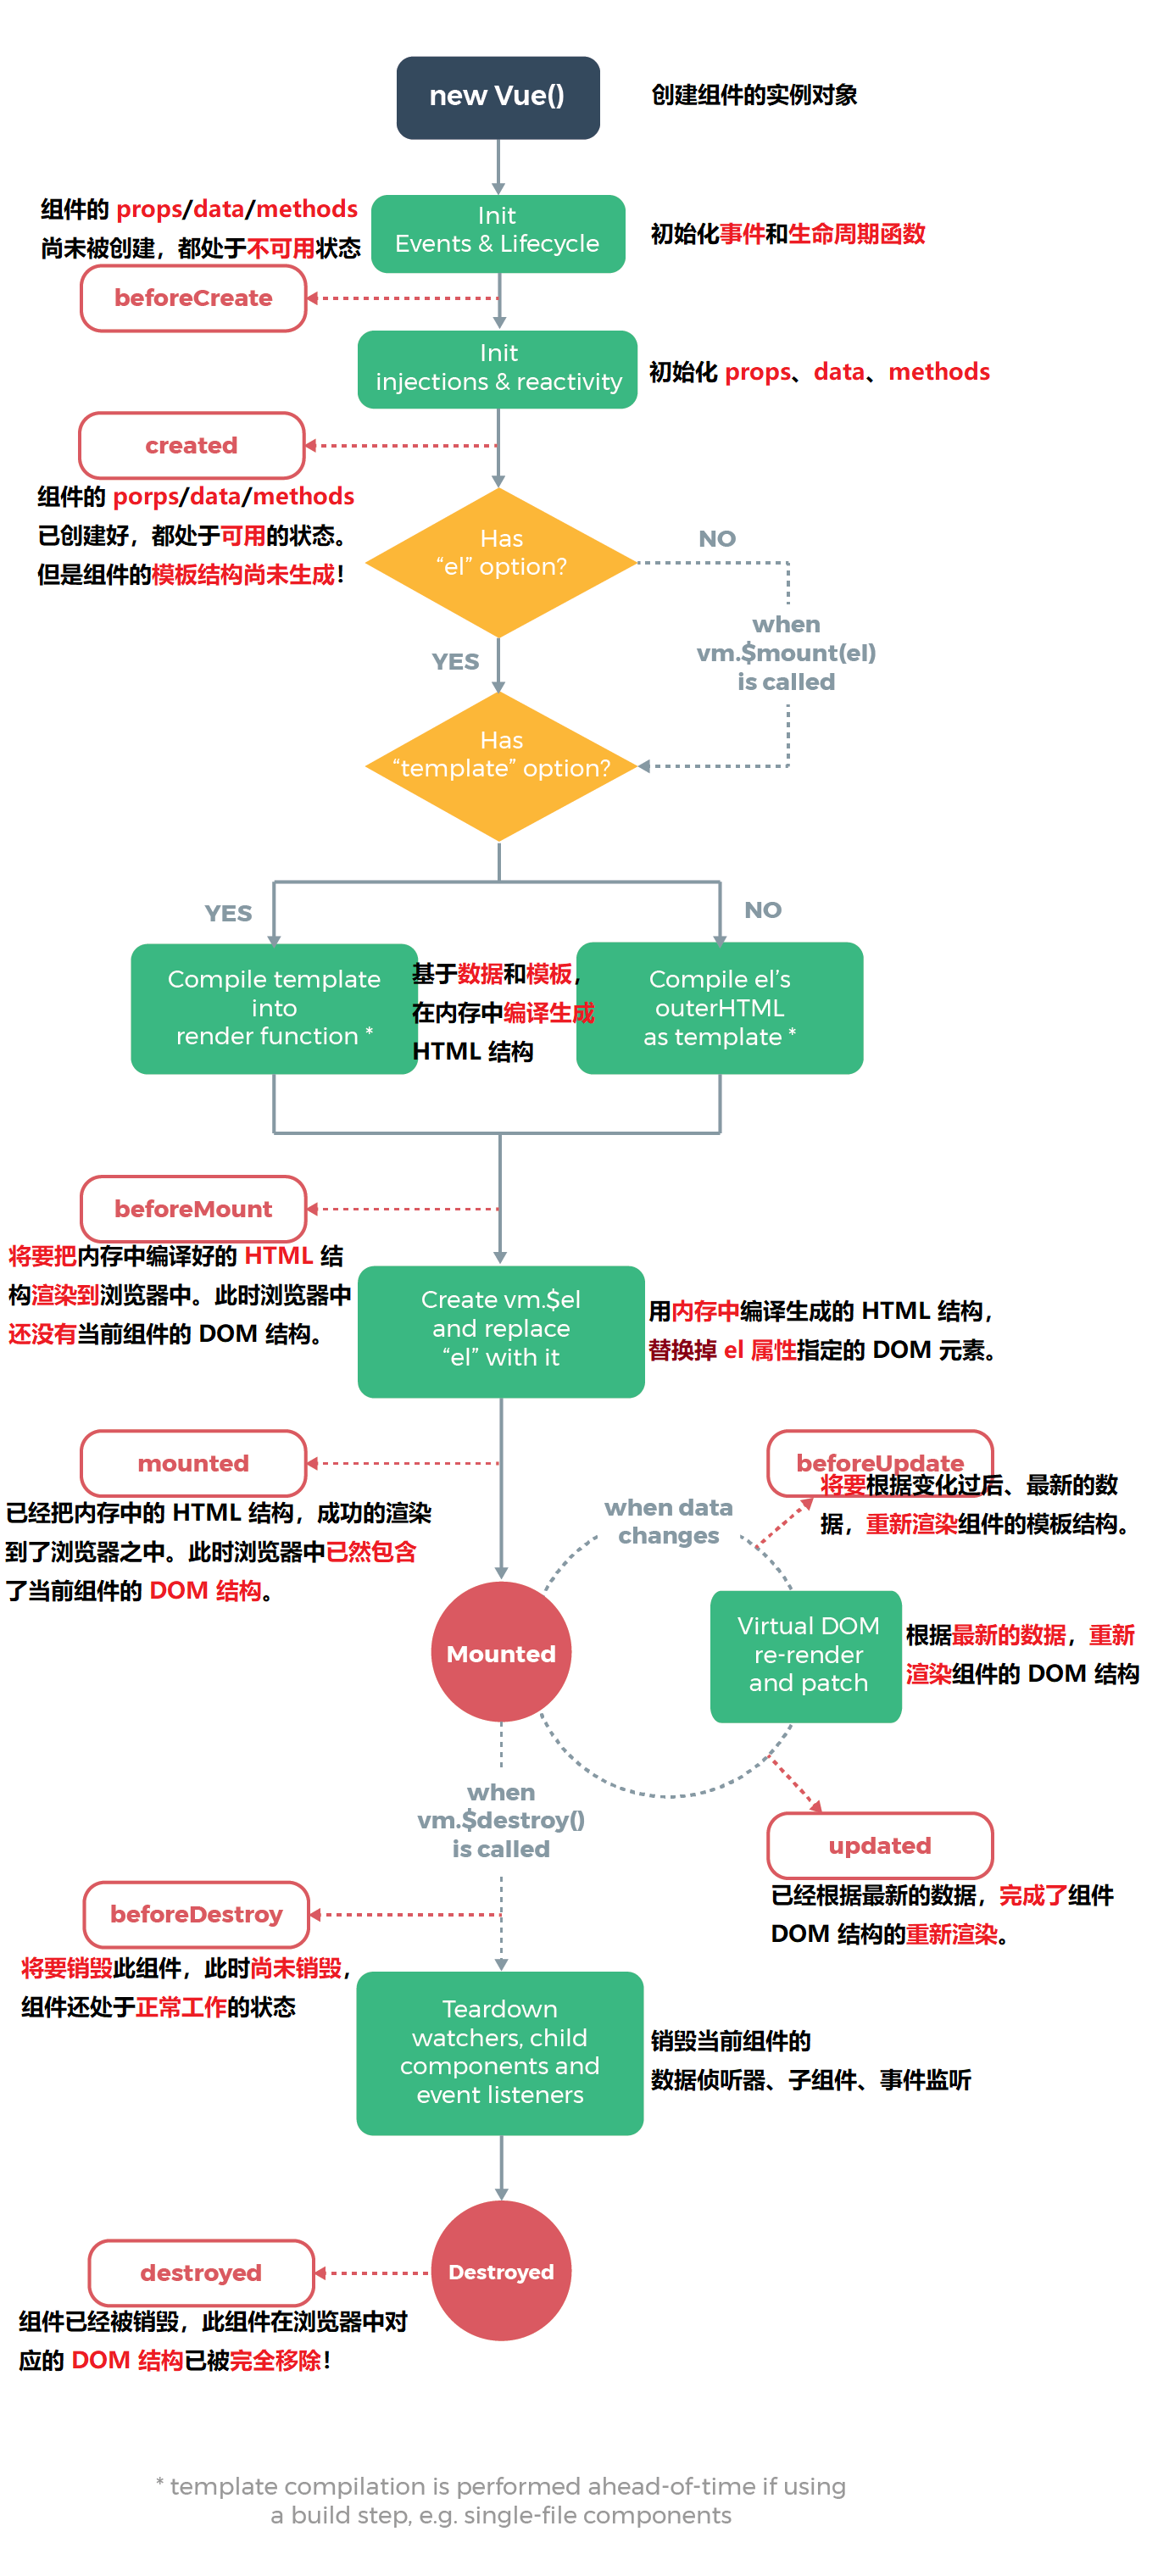
组件的生命周期
什么是生命周期
生命周期(Life Cycle)是指一个组件从创建 -> 运行 -> 销毁的整个阶段,强调的是一个时间段。
当我们想要在组件的生命周期过程中进行一些操作时,我们就需要使用生命周期函数来进行操作
生命周期函数:是由 vue 框架提供的内置函数,会伴随着组件的生命周期,自动按次序执行。
注意:生命周期强调的是时间段,生命周期函数强调的是时间点。
生命周期函数的分类
创建阶段
- beforeCreate
- created
发起 Ajax 最早的时机,请求数据,还不可以操作DOM元素
- beforeMount
- mounted
组件第一次被渲染到浏览器中
操作 DOM 的最早的时机
创建阶段的生命周期函数只执行一次
运行阶段
- beforeUpdate
- updated
能够操作到最新的 DOM 元素
运行阶段的生命周期函数可以执行多次
销毁阶段
- beforeDestroy
- destroyed
组件的数据共享
在开发中,组件之间的关系一般分为 父子关系 和 兄弟关系
父组件向子组件传递数据
通过在子组件中定义自定义属性,在父组件中绑定数据后将值传给子组件
| 父组件 |
子组件 |
1
2
3
4
5
6
7
8
9
10
11
12
13
14
15
16
17
18
19
20
21
22
23
| <template>
<div class="app-container">
<p>{{ userinfo }}</p>
<div class="box">
<Left :msg="message" :user="userinfo"></Left>
</div>
</div>
</template>
<script>
import Left from '@/components/Left.vue'
export default {
data() {
return {
message: 'hello yjr1100',
userinfo: { name: 'yjr1100', age: 3 },
}
},
components: {
Left
}
}
</script>
|
|
1
2
3
4
5
6
7
8
9
10
11
12
| <template>
<div class="left-container">
<h3>Left 组件</h3>
<p>msg 的值是:{{ msg }}</p>
<p>user 的值是:{{ user }}</p>
</div>
</template>
<script>
export default {
props: ['msg', 'user']
}
</script>
|
|
在这个过程中,对于基本数据类型,就是复制了一份真的值传了过来,但是对于对象类型数据,传的是对数据的引用,如果直接对子组件中的对象数据赋值,那么该对象就指向了新的对象,如果是修改子组件中的对象的属性,那么父组件中对象的属性也会改变。
当然我们之前就说了,不建议直接修改props中的数据,如果我们需要使用,建议复制一份进行操作
子组件向父组件传递数据
子组件向父组件传递值,需要使用自定义事件
- 在子组件中使用
$emit() 来触发自定义事件,$emit()接收两个参数,第一个参数是一个字符串代表事件名称,第二个参数是要传递的数据
- 父组件中给子组件标签绑定其自定义事件,并定义事件处理函数(这里可以把子组件的自定义事件名称看作类似于
click 这样的,我们也可以像 @click="btnclick" 一样使用@绑定自定义事件,并且定义一个事件处理函数)
| 父组件 |
子组件 |
1
2
3
4
5
6
7
8
9
10
11
12
13
14
15
16
17
18
19
20
21
22
23
24
25
26
27
28
29
30
| <template>
<div class="app-container">
<h1>App 根组件 --- {{ countFromSon }}</h1>
<div class="box">
<Right @numchange="getNewCount"></Right>
</div>
</div>
</template>
<script>
import Right from '@/components/Right.vue'
export default {
data() {
return {
countFromSon: 0
}
},
methods: {
getNewCount(val) {
console.log('numchange 事件被触发了!', val)
this.countFromSon = val
}
},
components: {
Right
}
}
</script>
|
|
1
2
3
4
5
6
7
8
9
10
11
12
13
14
15
16
17
18
19
20
21
22
23
24
| <template>
<div class="right-container">
<h3>Right 组件 --- {{ count }}</h3>
<button @click="add">+1</button>
</div>
</template>
<script>
export default {
data() {
return {
count: 0,
}
},
methods: {
add() {
this.count += 1
this.$emit('numchange', this.count)
}
}
}
</script>
|
|
兄弟组件之间的数据共享
在vue2.x中兄弟组件之间数据共享的方案是 EventBus
EventBus 是我们自己定义的一个js模块,用来向外共享一个Vue实例对象
EventBus 的使用步骤
创建 eventBus.js 模块,并向外共享一个 Vue 的实例对象
在数据发送方,调用 bus.$emit(‘事件名称’, 要发送的数据) 方法触发自定义事件
在数据接收方,调用 bus.$on(‘事件名称’, 事件处理函数) 方法注册一个自定义事件
1
2
3
4
5
|
import Vue from 'vue'
export default new Vue()
|
| Legt发送子组件 |
Right接收子组件 |
1
2
3
4
5
6
7
8
9
10
11
12
13
14
15
16
17
18
19
20
21
22
| <template>
<div class="left-container">
<button @click="send">把好诗发给 Right</button>
</div>
</template>
<script>
import bus from './eventBus.js'
export default {
data() {
return {
str: `这是Left子组件发给Right子组件的数据`
}
},
methods: {
send() {
bus.$emit('share', this.str)
}
}
}
</script>
|
|
1
2
3
4
5
6
7
8
9
10
11
12
13
14
15
16
17
18
19
20
21
22
23
| <template>
<div class="right-container">
<p>{{ msgFromLeft }}</p>
</div>
</template>
<script>
import bus from './eventBus.js'
export default {
data() {
return {
msgFromLeft: ''
}
},
created() {
bus.$on('share', val => {
console.log('在 Right 组件中定义的 share 被触发了!', val)
this.msgFromLeft = val
})
}
}
</script>
|
|
ref 引用
在vue中,程序员本意是不需要操作DOM,只需要把数据维护好就可以了,在vue项目中,不建议安装和使用 jQuery ,假设我们需要在vue项目之中操作DOM,我们可以使用ref引用。
什么是ref引用
ref 用来辅助开发者在不依赖于 jQuery 的情况下,获取 DOM 元素或组件的引用。
每个 vue 的组件实例上,都包含一个 $refs 对象,里面存储着对应的 DOM 元素或组件的引用。默认情况下,组件的 $refs 指向一个空对象
ref获取DOM
我们只需要在标签中添加ref属性,就可以通过 Vue 的 $refs 得到该DOM元素,注意ref的名字不要冲突了
1
2
3
4
5
6
7
8
9
10
11
12
13
14
15
16
17
18
19
20
21
| <template>
<div class="app-container">
<h1 ref="myh12">App 根组件</h1>
<button @click="showThis">打印 this,颜色改变</button>
</div>
</template>
<script>
export default {
methods: {
showThis() {
console.log(this)
this.$refs.myh12.style.color = 'red'
}
}
}
</script>
|
ref获取组件
同样的,我们只需要在页面对应组件中写入 ref 属性,就可以使用该属性得到组件,并且访问组件内的数据和函数
1
2
3
4
5
6
7
8
9
10
11
12
13
14
15
16
17
18
19
20
21
22
23
24
| <template>
<div class="app-container">
<button @click="onReset">重置 Left 组件的 count 值为 0</button>
<div class="box">
<Left ref="comLeft"></Left>
</div>
</div>
</template>
<script>
import Left from '@/components/Left.vue'
export default {
methods: {
onReset() {
this.$refs.comLeft.resetCount()
}
},
components: {
Left
}
}
</script>
|
利用 this.nextTick(cb) 和 ref 实现切换
下面的案例实现点击按钮,显示文本框,并且文本框自动获取焦点,当文本框失去焦点的时候,显示按钮
组件的 $nextTick(cb) 方法,会把 callback 回调推迟到下一个 DOM 更新周期之后执行。通俗的理解是:等组件的
DOM 更新完成之后,再执行 cb 回调函数。从而能保证 cb 回调函数可以操作到最新的 DOM 元素。
1
2
3
4
5
6
7
8
9
10
11
12
13
14
15
16
17
18
19
20
21
22
23
24
25
26
27
28
29
30
31
32
33
34
35
36
37
38
39
40
41
42
| <template>
<div class="app-container">
<input type="text" v-if="inputVisible" @blur="showButton" ref="iptRef" />
<button v-else @click="showInput">展示输入框</button>
<div class="box">
<Left ref="comLeft"></Left>
</div>
</div>
</template>
<script>
import Left from '@/components/Left.vue'
export default {
data() {
return {
inputVisible: false
}
},
methods: {
showInput() {
this.inputVisible = true
this.$nextTick(() => {
this.$refs.iptRef.focus()
})
},
showButton() {
this.inputVisible = false
}
},
components: {
Left
}
}
</script>
|
不使用 updated() 生命周期函数是因为每次数据变化都会调用 updated ,当该元素被隐藏不存在时也会执行,此时就会报错